User Tools
Sidebar
Navigation
hardware:quick-start:ir-blaster-ir-rules
Table of Contents
IR Blaster - IR Rules Guide/Tutorial
IR Blaster Overview
The CommandFusion IR Blaster designed to literally blast out IR in many directions at once to flood a room with IR.
This can be used to control a number of devices at once, without needing to run an individual wired emitter to each unit.
The IR Blaster has 12 internal emitters at the front and sides, giving it an output of 270 degrees. On top of that, it also has a 3.5mm output to connect an external wired IR emitter if required. It also has an IR receiver on board, as well as a 3.5mm IR receiver input.

IR Rules
The IR Blaster can be used to recognize incoming IR codes, then trigger a macro of actions on the CFLink bus or on the IR Blaster itself, such as transmit another IR code from the internal blasters. We call this feature ‘IR Rules’ and this guide will look at why this is useful, and how to implement IR rules correctly.
What Can IR Rules Be Used For?
One of the main uses for IR Rules is to allow for one remote control, to control multiple devices.
Our Example/Guide
You can see a video version of this guide below, or continue reading through the text guide.
In this guide we will use the following example:
We have a Samsung Television and a Soniq Bluray player. Now our user doesnt like having to switch between two different remote controls to watch a Bluray. At the moment, the user has to:
- Switch the TV on with the Samsung remote
- Switch the Bluray player on with the Soniq remote
- Switch the TV to the Bluray input with the Samsung remote
- Press play on the Soniq remote
- Adjust the volume on the Samsung remote
As you can see, when you write down the required actions - it can be quite daunting, especially for people that arent comfortable with modern technology.
Our Samsung remote has some buttons on it which are designed to control a Samsung Bluray/DVD player. So in this guide, we are going to program these buttons to control our Soniq Bluray player.

What Do We Need?
Apart from both remote controls, we need the following items:
- A CommandFusion LAN Bridge
- A CommandFusion IR Blaster
- A CommandFusion IR Learner
We also need to make sure we have the latest versions of:
- Firmware for the LAN Bridge, IR Learner and the IR Blaster
Step 1 - Learn IR Codes
Firstly you will need to use your IR Learner software and the IR Learner itself to learn the commands for the Soniq remote - these are the commands which the IR blaster will be outputting to control the Soniq Bluray player.
If you don't know how to use the IR Learner software, you can check out our quick start guide for the IR Learner.
So Learn the commands that you want to send to the Soniq Bluray player, and save the IR File.
These commands would likely be:
- Power toggle
- Play
- Pause
- Skip forward
- Skip Backwards
We then need to start a new file, and learn the commands for the Samsung remote - these are the commands that the IR Blaster will detect, before sending out the appropriate Soniq code.
Learn the codes for the Samsung buttons you want to use and then save a second IR file.
For our example we will learn:
- Red button (for Bluray power)
- Skip Forward
- Skip Backwards
- Play
- Pause
Step 2 - Configuration in System Commander
Then start System Commander. You will need to make sure you have the latest version of system commander, as well as the latest firmware installed for your devices.
If you need to learn the basics of system commander, You can check out the System Command quick start guide here.
For now, we will assume you know the basics.
Upload IR Files
The first thing we need to do here, is upload the IR files to our IR Blaster.
So navigate to the IR Files Tab (1 in image below) of your IR Blaster, and upload both IR files you just created. Do this by clicking Add File (2 in image below), and navigating to where you saved the file. Click the Save to Device (3 in image below) button to upload the file.
When the file has been added, you can see that you can expand and see what commands each file has in it (4 in image below). Uploading these files is not totally necessary, but it does make things simpler for us later on.

Create Macros
Then we need to go to the IR rules tab. We will create a macro for each Soniq command that we want to send out. So there will be separate macros for all the commands we learnt.
Then we will be creating an IR rule, so that when it receives a certain IR code from the Samsung remote, the IR Blaster will activate the appropriate macro - thus controlling the Soniq bluray player from our Samsung remote. The image below shows the basics of how IR Rules works.

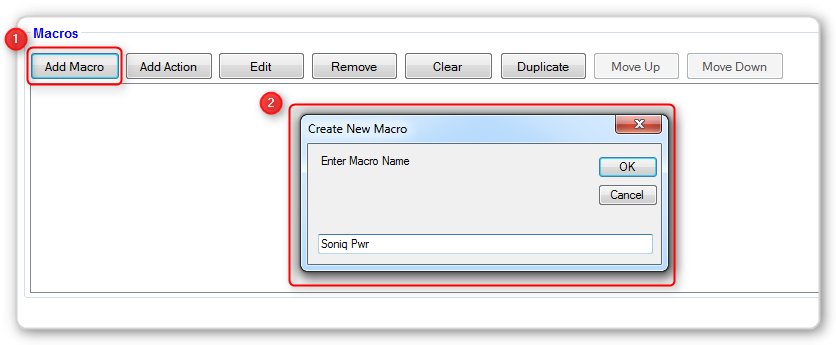
So first we create our macros. This is the macro that the IR blaster will activate to send the Soniq code when it receives the corresponding IR Command from the Samsung remote Do this by going to the IR Rules tab, then clicking Add Macro (1 in image below). Enter and appropriate Macro name (2 in image below) and click OK.
The Add Action window will then be automatically opened for you. we then use the Action Builder to create our commands. Click Action Builder
From the Action type dropdown, we choose IR (1 in image below). Select your IR Blaster as the Target Device (2 in image below), because we have selected IR, it will show only devices that have an IR capability.
Select Port 1 (3 in image below), which is our onboard IR blaster output. Under format, select MEM (4 in image below), which is the onboard memory of the unit where we saved our IR files earlier. Then click build (5 in image below).

Next, the IR Data Builder window comes up. This is where we select the IR file we uploaded to the IR Blaster, and the command we want the macro to send out.
Under your device ID, we will select the Soniq remote file (1 in the image below). Remember, we are programming the code which the device will blast out.
Then select the function that you want to send, we will select power first (2 in the image below).

Click OK, then OK again.
So the action builder has built the command for us (in image below), Basically, this command just says “Send this code from IR Blaster with CFLink ID of 21”. If you want, you can click the test command button, which will tell your IR Blaster to send out that command right now for testing purposes. Click OK.

We then need to create a macro for each code we want to send - so do this for the rest of the commands you learnt.
Add IR Rules
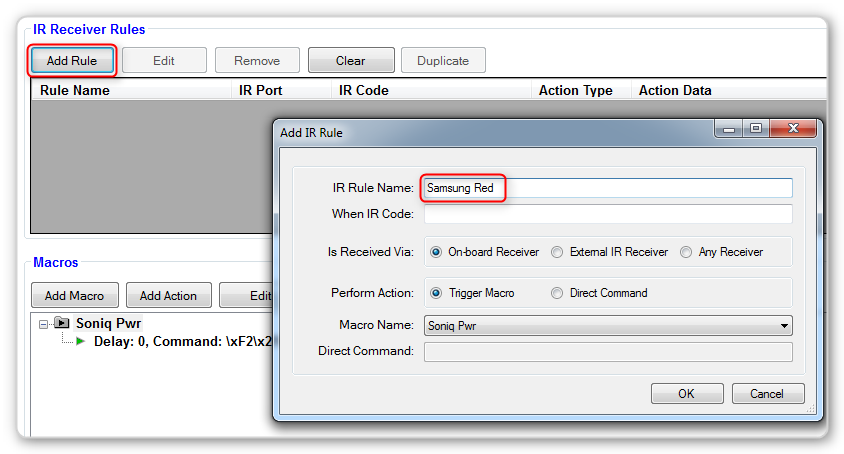
Once we have added all the macros, we then need to add the IR Receiver Rules. So we click Add Rule (1 in image below).
Add an IR Rule name (2 in image below), we are going to use the red button on the Samsung Remote - we will call it Samsung Red.
We then need to go back to the IR Learner software, and right click on our red button code that we learnt from our Samsung Remote. Select Copy STR Code. The STR code is CommandFusion's proprietary IR format.

Now go back to System Commander and paste this code into the When Ir Code box (1 in image below). Make sure that On Board Receiver is checked (2 in image below), and select the Perform Action to be Trigger Macro (3 in image below).
Then from the dropdown Macro Name (4 in image below), select the power macro we just created.
So what we have just done is created a rule, that when the red buttoncode is received from our Samsung Remote via the onboard receiver, we want the IR Blaster to send out the Power code for the Soniq Bluray.
Click OK, you will then need to go through and do the same for each command you want to set up a rule for. Once you have done that, click Save To Device. This will upload the rules and macros to the IR Blaster.
Step 3 - Test It!
You can now test if it works! Point the Samsung remote at the device, hit the power button we programmed, and there you go - the Soniq Bluray player turns on and we can control it from our Samsung remote.
So that's it, its fairly easy to program one remote to control many devices. There are many different uses that this functionality could be used for such as creating macros where lights are turned off, blinds are closed and the TV source is set, all from a single remote button press.
hardware/quick-start/ir-blaster-ir-rules.txt · Last modified: 2013/09/20 02:57 by aaron